
Equipment Reviews
Refelting a Pool Table: 8 Steps to Install New Felt
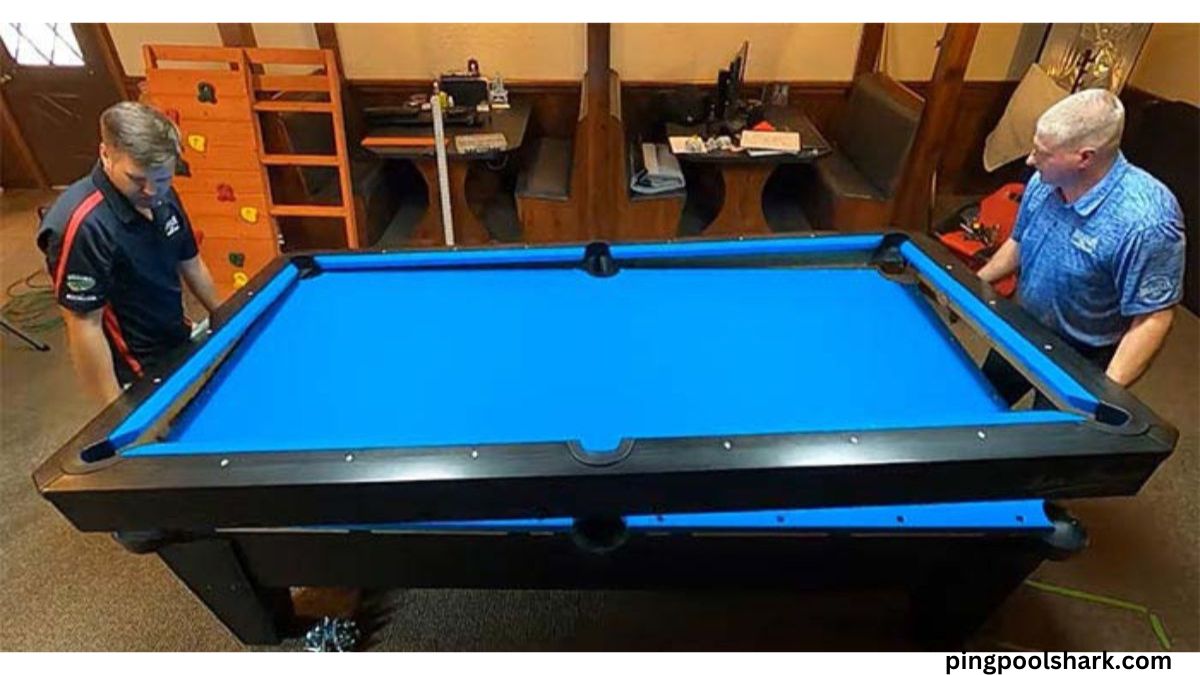
Refelting a pool table is a task that can breathe new life into your gaming space. Whether your current felt is worn out, stained, or simply outdated, replacing it can make a world of difference in both aesthetics and gameplay. In this guide, we’ll walk you through the process of refelting your pool table in 8 simple steps.
Step 1: Gather Your Materials
Before you begin, make sure you have all the necessary materials on hand. You’ll need new pool table felt, a staple gun, staples, a staple remover, scissors, a utility knife, and a vacuum cleaner.
Step 2: Remove the Old Felt
Carefully remove the old felt from the pool table surface using a staple remover. Take your time to avoid damaging the table surface.
Step 3: Clean the Surface
Once the old felt is removed, use a vacuum cleaner to thoroughly clean the table surface, removing any dust, dirt, or debris.
Step 4: Measure and Cut the New Felt
Lay out the new felt over the table surface and trim it to size using scissors or a utility knife. Leave a few inches of excess felt around the edges to allow for stretching.
Step 5: Align and Smooth the Felt
Carefully align the cut piece of felt over the table surface, ensuring it is centered and free of wrinkles. Use your hands to smooth out any imperfections.
Step 6: Staple the Felt
Starting from the center of one side, use a staple gun to secure the felt to the table rails. Work your way around the table, stretching the felt slightly as you go to ensure a tight fit.
Step 7: Trim Excess Felt
Once the felt is securely attached, use scissors or a utility knife to trim any excess material from the edges of the table.
Step 8: Test and Enjoy
Finally, test the surface by rolling a few balls across it. Ensure that the felt is smooth and free of bumps or wrinkles that could affect gameplay. Then, invite your friends over and enjoy a game on your newly refelted pool table!
Frequently Asked Questions
- How do you put new felt on a pool table?
To put new felt on a pool table, you’ll need to remove the old felt, clean the surface, measure and cut the new felt to size, align and smooth it over the surface, staple it down, trim any excess, and finally, test the surface for smoothness and playability. - How to install pool table?
Installing a pool table involves assembling the table frame, attaching the legs, leveling the table, installing the slate, covering the slate with felt, and then adding the rails, pockets, and other accessories. - Can I Refelt my own pool table?
Yes, you can refelt your own pool table if you have the necessary tools, materials, and patience. It’s a straightforward process but may require some practice to achieve a professional-looking result. - How do you move an 8 pool table?
Moving an 8-foot pool table requires careful planning and coordination. You’ll need to disassemble the table, carefully pack and transport each component, and then reassemble the table at its new location. - How do you make a free play pool table?
To make a pool table available for free play, simply remove any coin-operated mechanisms or locking mechanisms from the table. You may also want to provide cues and balls for players to use without requiring payment. - How do you move a pool table down steps?
Moving a pool table down steps can be challenging and should be done with caution. Use professional moving equipment such as dollies, straps, and furniture sliders, and consider hiring experienced movers to assist with the process. - How heavy is a pool table?
The weight of a pool table can vary depending on its size and construction, but on average, a slate pool table can weigh anywhere from 700 to 1,000 pounds. - How do you open a pool table?
To open a pool table, simply remove the cover or cloth that is covering the playing surface. This is typically done by lifting the cover or cloth from one end of the table and folding it back. - How heavy is pool table slate?
Pool table slate can be quite heavy, with each piece weighing between 150 to 250 pounds, depending on the size and thickness of the slate.


Introduction
Divorce can be an emotionally challenging experience, but when you’re in the public eye, it becomes even more complicated. The divorce between Amber’ley Della-Calce Jorden and her partner drew significant attention from fans and the media alike. Amber’ley Della-Calce Jorden’s divorce not only shook her personal life but became a hot topic for discussion. This article takes a closer look at the relationship’s breakdown, the legal struggles, and the lessons we can learn from it.
A Brief History of Their Relationship
Amber’ley Della-Calce Jorden and her partner were once a power couple, capturing the interest of both fans and media outlets with their high-profile romance.
Early Days: How They Met
Amber’ley and her spouse first crossed paths during a glamorous event, where they instantly connected. Their chemistry quickly became apparent, and the couple soon became inseparable. They made multiple public appearances together, showcasing a seemingly strong relationship filled with love and respect. Milestones such as vacations, collaborative projects, and public displays of affection further cemented their image as a power couple.
Signs of Trouble
However, cracks in the relationship began to show long before the formal separation. Subtle signs, such as fewer joint public appearances and cryptic social media posts, hinted at tension. Rumors of disagreements and disputes behind the scenes slowly began circulating, but many fans dismissed them as unfounded gossip.
The Divorce Announcement
Timeline
The official announcement of Amber’ley Della-Calce Jorden’s divorce shocked the public. Although there had been rumors, the news hit hard when it was finally confirmed. The couple released statements explaining that they had mutually agreed to part ways due to “irreconcilable differences.” This came after months of speculation and media coverage regarding the state of their relationship.
Public Reaction
Fans and media outlets were quick to respond to the news. While some expressed support for Amber’ley and her partner during this difficult time, others speculated about the reasons behind the split. The announcement sparked widespread discussion, with tabloids often exaggerating the situation. Fans on social media were divided, with some mourning the end of a beloved partnership and others criticizing the couple’s decisions.
Legal Battles and Proceedings
Custody Arrangements
If children were involved in the marriage, custody battles can often become one of the most contentious issues in a high-profile divorce. In the case of Amber’ley Della-Calce Jorden’s divorce, reports suggested that both parties were fighting hard to secure the best possible arrangements for their children. Joint custody was a topic of discussion, but details remained private for the sake of the children’s well-being.
Property Division
The division of assets was another significant aspect of the divorce proceedings. Given the couple’s financial success and shared properties, including luxury homes and business ventures, the process of dividing assets was complex. Both parties sought fair distribution, and it was speculated that private negotiations took place to avoid further public drama.
Financial Settlements
Financial settlements, including potential alimony and child support agreements, were also part of the divorce discussion. Both Amber’ley and her partner had considerable wealth, but reports suggested that they reached an amicable agreement regarding financial support post-divorce. This allowed both individuals to move forward without the weight of drawn-out financial disputes.
Emotional Toll and Public Scrutiny
Impact on Amber’ley and Jorden
The emotional toll of the divorce on Amber’ley Della-Calce Jorden and her spouse was significant. Both parties struggled with the strain of ending a once-thriving relationship. Public scrutiny only added to their emotional burden, as the media and fans speculated endlessly about the reasons behind the split.
Media Attention
Tabloids and gossip sites were quick to cover every detail of the divorce, with paparazzi hounding Amber’ley and her former spouse at every turn. The constant media attention made it difficult for the couple to process their emotions in private. Every move they made was analyzed, often leading to false stories and unnecessary drama.
Social Media Backlash
As with any high-profile divorce, social media played a huge role in the narrative. Both Amber’ley and her spouse faced online harassment from some users, with accusations and rumors spreading like wildfire. Negative comments often overshadowed the more supportive voices, which only deepened the emotional strain on the couple.
Key Lessons Learned from Their Divorce
Relationship Advice
There are several takeaways from Amber’ley Della-Calce Jorden’s divorce that can help others in relationships. Communication, mutual respect, and compromise are crucial components of any successful relationship. The couple’s separation underscores the importance of addressing issues early before they escalate into irreconcilable differences.
Coping with Divorce
For individuals going through a divorce, Amber’ley’s experience offers several lessons. Seeking emotional support from friends, family, or professionals is vital for coping with the emotional toll. Additionally, legal guidance can make navigating financial and custody arrangements smoother.
The Impact of Public Scrutiny
Public scrutiny can amplify the difficulties of an already painful process like divorce. While most people don’t have to deal with paparazzi or media attention, social media can often feel just as invasive. It’s essential to focus on personal well-being and block out negativity from external sources, especially online.
YOU MAY ALSO LIKE
Atila Altaunbay – Grace Jones’ Ex-Husband
Conclusion
The divorce between Amber’ley Della-Calce Jorden and her partner was not just a personal journey but a public spectacle. While their relationship’s end was filled with emotional and legal challenges, it offers key insights into the importance of handling difficulties with grace, maintaining open communication, and seeking support when necessary. Divorce is never easy, but with the right support and mindset, it’s possible to move forward and find peace.
FAQs
1. What led to Amber’ley Della-Calce Jorden’s divorce?
The couple cited irreconcilable differences as the main reason for their separation, though signs of strain had been visible for some time.
2. How did the public react to the Amber’ley Della-Calce Jorden divorce?
Fans were divided, with some expressing support while others speculated about the reasons behind the split. Media outlets heavily covered the divorce.
3. What were the main legal issues in the Amber’ley Della-Calce Jorden divorce?
Custody arrangements, property division, and financial settlements were significant legal aspects of their divorce proceedings.
4. How did the media affect Amber’ley Della-Calce Jorden’s divorce?
Media attention made it difficult for the couple to handle the divorce privately, as they were constantly under public scrutiny.
5. What lessons can we learn from Amber’ley Della-Calce Jorden’s divorce?
Communication, mutual respect, and seeking emotional and legal support are crucial in handling the challenges of divorce effectively.
Introduction
The game of 8-ball pool is an engaging and strategic pastime enjoyed by enthusiasts of all skill levels around the globe. Among the essential skills every player must possess is the ability to rack the balls effectively at the beginning of each game. A properly arranged rack sets the stage for a fair and competitive match. In this guide, we’ll delve into the intricacies of 8-ball pool rack setups, exploring what they are, the rules governing them, and how to execute a professional rack setup in six simple steps.
What Is an 8-Ball Pool Rack?
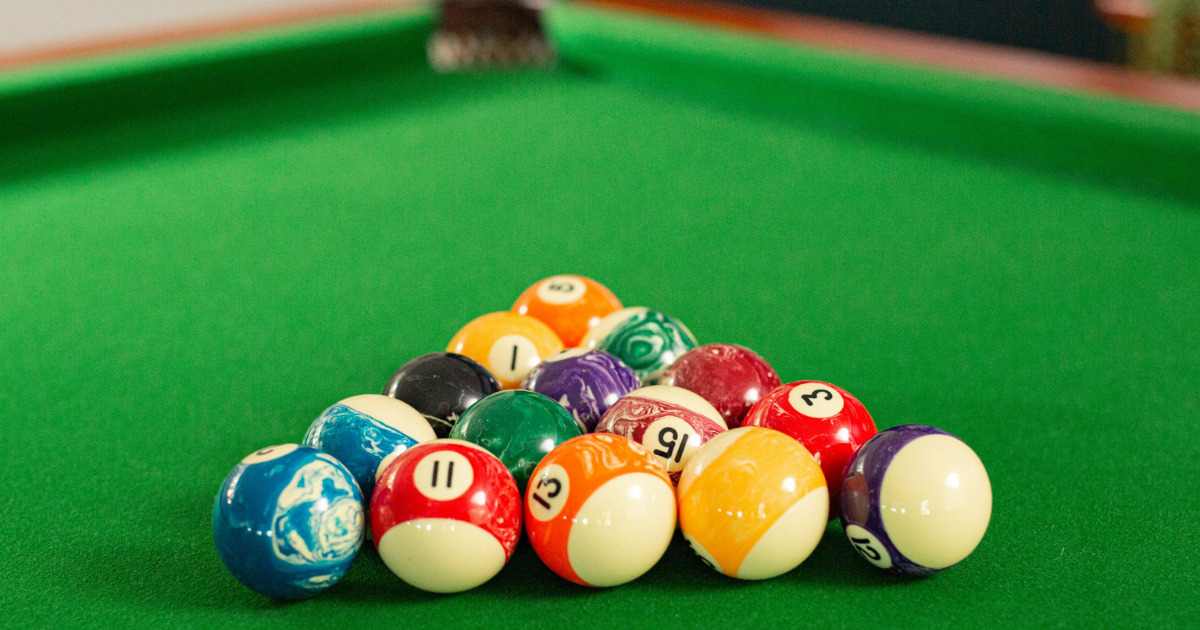
Before diving into the specifics of how to rack in 8-ball professionally, it’s important to understand what exactly an 8-ball pool rack is. In simple terms, the rack is the triangular frame used to organize the fifteen balls (one cue ball and fifteen object balls) at the beginning of a game. The purpose of the rack is to create a tight formation that allows for a fair and even distribution of balls across the table.
What Are Racking Rules for 8-Ball?
Racking rules vary slightly depending on the specific version of 8-ball being played and the governing body or league. However, some general guidelines apply universally. The key principles include:
- The Apex Ball: The 8-ball should be placed at the center of the rack, with the apex (front) ball of the triangle directly on the foot spot.
- Alternating Ball Types: The balls should be racked in a specific pattern, with one solid (numbered) ball followed by one striped (numbered) ball, and so on, forming a solid-stripe-solid-stripe pattern.
- Random Placement: Within the solid and striped groups, the specific order of the balls is not important, as long as the alternating pattern is maintained.
- The Back Corners: The corners of the triangle rack should contain one solid and one striped ball.
- Tight Formation: The balls should be arranged tightly within the rack, with minimal gaps between them to prevent movement during the break.
6 Steps to Set Up in 8-Ball Like a Pro
Now, let’s outline a step-by-step process to set up the 8-ball rack professionally:
Step 1: Prepare the Table
Before beginning the racking process, ensure that the pool table surface is clean and free of debris. Brush the table with a clean cloth or use a table brush to remove any dust or chalk residue.
Step 2: Position the Rack
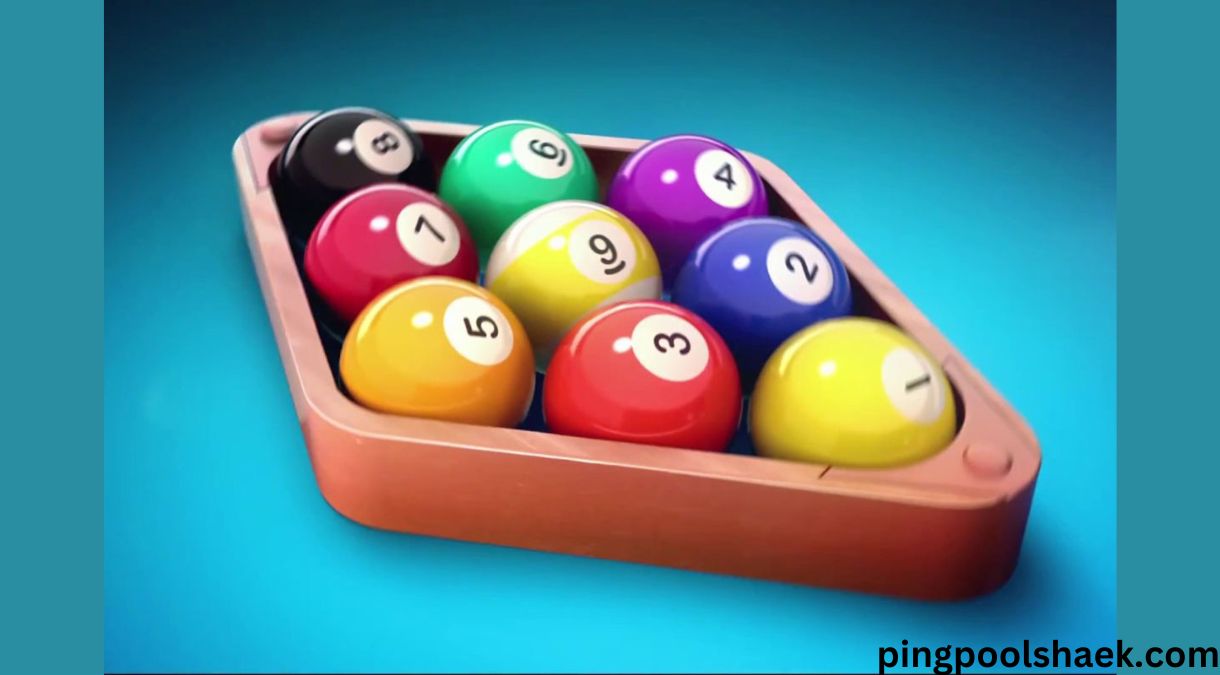
Place the triangular rack at the foot of the table, with the apex ball positioned directly over the foot spot. Ensure that the rack is centered and aligned with the table’s head string.
Step 3: Arrange the Balls
Begin by placing the 1-ball (solid) at the front of the rack, followed by the 9-ball (striped) directly behind it. Continue alternating between solid and striped balls, working your way towards the back corners of the rack.
Step 4: Fill the Corners
Place one solid and one striped ball in each of the back corners of the rack. This arrangement helps distribute the balls evenly across the table and minimizes the likelihood of clusters forming during the break.
Step 5: Tighten the Formation
Once all fifteen balls are in place, gently press down on the top of the rack to compress the balls and create a tight formation. Ensure that there are no gaps between the balls and that they are snugly packed within the rack.
Step 6: Remove the Rack
With the balls securely positioned, carefully lift the rack off the table, being mindful not to disturb the arrangement of the balls. The rack should lift cleanly away, leaving the balls in a neat triangular formation.
How to Rack 8-Ball?
Racking in 8-ball is a fundamental skill that every player should master. By following the proper racking guidelines and techniques, you can ensure a fair and consistent start to each game, setting the stage for exciting competition on the pool table.
FAQs
Q: How do you professionally rack an 8-ball?
A: To rack an 8-ball professionally, follow the standard racking rules, ensuring that the balls are arranged in a tight triangle with the apex ball over the foot spot.
Q: What is the proper 8-ball layout?
A: The proper 8-ball layout involves arranging the balls in a tight triangle formation, with the apex ball (8-ball) at the center and one solid and one striped ball in each back corner.
Q: What are the rules for racking in APA pool?
A: In APA (American Poolplayers Association) pool, the racking rules are similar to standard 8-ball rules, with specific guidelines regarding ball placement and tightness of the rack.
Q: How do you set up an 8-ball?
A: To set up an 8-ball game, follow the standard racking procedures outlined in this guide, ensuring that the balls are arranged in a tight triangle with the 8-ball at the center.
In conclusion, mastering the art of racking in 8-ball is essential for any serious pool player. By understanding the principles of proper racking and following the step-by-step techniques outlined in this guide, you can ensure a fair and competitive start to every game. With practice and attention to detail, you’ll be racking like a pro in no time.
Introduction
Welcome to the thrilling world of 9-ball pool, where precision, strategy, and finesse merge into an electrifying game. Whether you’re a seasoned player looking to refine your skills or a beginner eager to learn the ropes, understanding the rules and proper setup of 9-ball is paramount to your success on the felt. In this comprehensive guide, we’ll delve into the nuances of 9-ball pool, covering everything from the rules of the game to expert tips on racking like a pro.
9-Ball Pool Rules
Before we delve into the intricacies of racking, let’s first familiarize ourselves with the fundamental rules of 9-ball pool. Unlike its counterpart, 8-ball, which involves pocketing balls in numerical order, 9-ball requires players to pocket the balls in ascending numerical order. The game is typically played with nine balls numbered one through nine, with the nine-ball serving as the game-winning shot.
Each player aims to pocket the balls in sequence, with the cue ball striking the lowest numbered ball on the table first. If a player successfully pockets the lowest numbered ball, they continue shooting until they miss or foul. Fouls in 9-ball pool can occur if a player fails to make contact with the lowest numbered ball, pockets the cue ball, or commits other infractions outlined in the official rules.
How To Rack 9-Ball Properly
Properly racking the balls is essential for ensuring a fair and consistent game of 9-ball pool. Follow these five key factors for a flawless 9-ball setup:
- Use a Quality Rack: Invest in a sturdy rack specifically designed for 9-ball pool. A precision-engineered rack ensures that the balls are tightly packed, minimizing gaps and inconsistencies.
- Position the One-Ball at the Front: Place the one-ball at the front of the rack, with the nine-ball in the center. This setup facilitates a smooth break, allowing the cue ball to strike the one-ball head-on.
- Alternate High and Low Balls: Arrange the remaining balls in the rack in an alternating pattern of high and low-numbered balls. This distribution promotes even dispersion upon breaking, reducing the likelihood of clustered balls.
- Center the Rack: Ensure that the rack is centered on the table, with the apex aligned precisely with the foot spot. Proper alignment maximizes the effectiveness of the break and minimizes the risk of balls jumping off the table.
- Apply Firm Pressure: Once the balls are properly positioned in the rack, apply firm pressure to secure them in place. Press down on the top of the rack while lifting slightly to create tension, then carefully remove the rack without disturbing the balls.
By adhering to these five factors, you’ll create the optimal conditions for a powerful and controlled break, setting the stage for an exhilarating game of 9-ball pool.
Frequently Asked Questions
- What is the correct way to rack for 9-ball?
The correct way to rack for 9-ball involves positioning the one-ball at the front of the rack, alternating high and low balls, centering the rack on the table, and applying firm pressure to secure the balls in place. - How do you rack pool balls like a pro?
Racking pool balls like a pro requires attention to detail and precision. Use a quality rack, position the balls correctly, and apply firm pressure to ensure a tight and consistent rack every time. - How can I be a better 9-ball player?
To improve your skills in 9-ball pool, focus on mastering the fundamentals, such as aiming, positioning, and cue ball control. Practice regularly, study advanced techniques, and learn from experienced players to enhance your gameplay. - How do you place 9 balls?
When placing the 9 balls for a game of 9-ball pool, arrange them in numerical order, with the one-ball at the front of the rack and the nine-ball in the center. Alternate high and low balls to promote an even break.
Conclusion
Mastering the art of racking and understanding the rules of 9-ball pool are essential steps on the path to becoming a skilled player. By following the guidelines outlined in this guide and incorporating them into your practice routine, you’ll elevate your game and enjoy greater success on the felt. So gather your cue, set up the balls, and prepare for an exhilarating journey into the world of 9-ball pool.

Newznav.com Crypto Archives Page: Your Gateway to Navigating Cryptocurrency

Edmonton Oilers Fan Flash Unedited: A Closer Look at the Viral Incident

https// gamemakerblog.net: The Ultimate Guide to GameMaker Blog

How Alex Charfen Gained Advantage Through Fastidiousness

Stagg 21 Kalimba Tuning Software: Perfect Your Sound Effortlessly

Divya Agarwal HealthSherpa: Pioneering Holistic Health and Wellness

Amber’ley Della-Calce Jorden Divorce: A Deep Dive into the High-Profile Split

23455 Breaking Waves Court: Beachfront Bliss in Millville, DE

Kingdom 801 RAW: A Turning Point in the Saga

How iCryptoAI.com Innovation Transforms Crypto Analysis
-

 Blog8 months ago
ping-pong-paddle-for-defense
-
Blog8 months ago
Unveiling the Top 10 Female Ping Pong Players of All Time
-
Ping Pong8 months ago
Improving Reflexes in Table Tennis: Exercises and Techniques
-
Blog8 months ago
How to Play a Forehand Loop in Ping Pong – An Important Step to Be a Pro
-
Blog8 months ago
BENEFITS OF PLAYING POOL – THE SPORT CAN HELP YOU MORE THAN YOU THINK
-
Blog8 months ago
Common Ping Pong Injuries and How to Avoid Them
-
Blog8 months ago
What is The Pool? Some Kind of Pool That Pool Lovers Have to Know
-
Pool7 months ago
How to Curve a Pool Ball Like a Pro: 3 Steps to Make a Masse Shot


